Hi, I am Elise. Today, I’m gonna show you how to make "kumahiko" bear icebox cookie recipe. Never skip today’s recipe. This is a simple recipe to try and is one of my family food recipes. This time, I will make it a little bit tastier. This will be really delicious. Not to mention, it’s super satisfying.
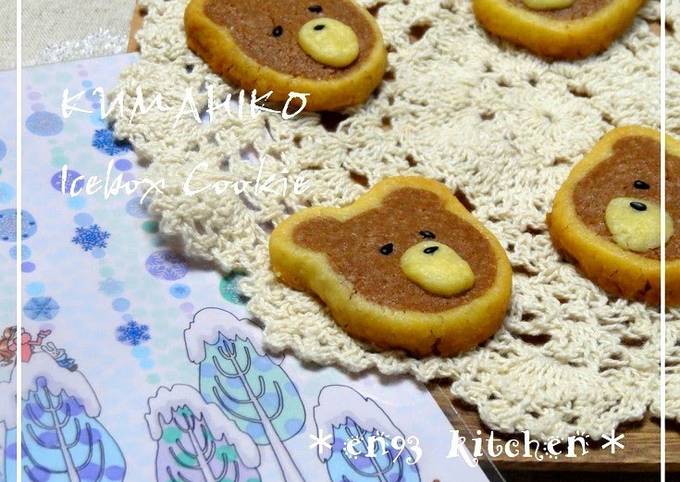
"Kumahiko" Bear Icebox Cookie Recipe
"Kumahiko" Bear Icebox Cookie is one of the most popular of current trending foods in the world. It’s appreciated by millions daily. It’s simple, it is fast, it tastes delicious. They’re nice and they look fantastic. "Kumahiko" Bear Icebox Cookie is something which I have loved my entire life.
To be with this recipe, we have to prepare a few ingredients. You can cook "kumahiko" bear icebox cookie using 7 ingredients and 28 steps. Here is how you cook it.
The ingredients needed to make "Kumahiko" Bear Icebox Cookie:
- Take 170 grams Cake flour
- Make ready 70 grams Raw cane sugar
- Get 120 grams Unsalted butter
- Get 1 Egg yolk
- Get 1 tsp Cocoa powder (unsweetened)
- Get 1 pinch Salt
- Get 1 Black sesame seeds for eyes and nose
Steps to make "Kumahiko" Bear Icebox Cookie:
- Bring the butter to room tempearture or microwave at 600 W for 30-40 seconds to soften. If you decide to use the microwave, please be careful not to melt it.
- Knead the butter until creamy.
- Add the raw cane sugar in 2-3 batches and stir well.
- Once the sugar has been incorporated, add the egg yolk. Mix some more.
- Mix it until it looks like this picture.
- Sift the flour into the bowl.
- Use a rubber spatula to combine by cutting into the dough.
- The mixture turns cbly like this picture.
- Take 210 g of dough out and mix with cocoa powder using a cutting motion.
- Divide the cocoa dough into 3 portions: 1 big ball for the face and other 2 small balls for ears. And also divide the plain dough into 2 portions: 1 big ball for the edge of the cookies and 1 small ball for the nose.
- Roll the big cocoa ball for the face into a thick rolling pin-like shape. Roll the 2 small balls for ears into thin sticks.
- Shape the thick piece into an oval shape as kumahiko has a little bit of an oval-shaped face.
- Make grooves with a chopstick for ears.
- It should look like this picture.
- Now place the thin sticks into the grooves.
- The end looks like this. Wrap with parchment paper or plastic wrap and place in the freezer.
- Meanwhile, roll the plain small ball (for nose) into a thin stick. Wrap with parchment paper or plastic wrap and keep in the freezer.
- Roll out the plain big ball wide enough to wrap around the face.
- When you stretch the dough, try using parchment paper. Fold the paper into a rectangle with the dough inside and roll it out. It makes beautiful rectangle shape. NOTE: This picture shows cocoa dough, but you’ll be rolling out the plain dough.
- Freeze for 5 minutes to make it easy to remove the parchment paper. Note: Apologies again for using cocoa dough for this picture.
- Roll it like this. Gently press the dough between the ears and around the cookie. Let it rest again in the freezer.
- After 20 minutes, take it out of the freezer and store in the fridge for 30 minutes. Slice into 4-5 mm thick cookies with knife.
- Take the thin stick for the nose out of the freezer and slice it very thinly. It should be easy to make thin slices since the dough is cold.
- Place the face cookies on a baking tray lined with parchment paper and be preheating your oven to 180°C. Meanwhile, place the sliced nose cookies on the face.
- Use black sesame seeds for the nose and eyes. Dip the tip of a chopstick in a water and put the sesame seed on it. It will make them easier to work with.
- Please refer to Step 26 offor the sesame seed’s decoration.
- Bake in the oven preheated to 180 °C for 17 minutes. Open the oven door after 7-8 minutes and cover with aluminium foil to avoid darkening the colors.
- Done! Please adjust the temperature and time depending on your oven.
So that is going to wrap it up for this special dish "kumahiko" bear icebox cookie recipe. Thank you very much for your time. I am confident that you can make this at home. There’s gonna be interesting food at home recipes coming up. Don’t forget to save this page on your browser, and share it to your family, friends and colleague. Thank you for reading. Let’s cook!